| Audio Caller ID
is very easy to use, normally requiring no user
setup. Just download and install the program,
and you'll be in control of your phone calls. The following screen shots
show the main application window, and all of the
option pages. The main window is divided into a
current call pane, and a call log section. The
call log display can be turned on/off. The
following image shows the main window:
|
| |
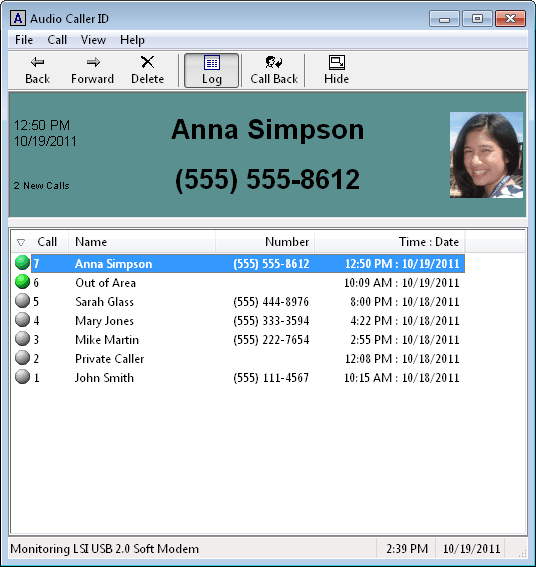 |
| Main Window |
| New calls will
have a green icon, while old calls will have a
gray icon. You can right click on a call to
perform call specific actions, or choose the
command from the menu or toolbar. When no call is
currently select the current call pane will show
the number of total calls, and the number of new
calls. You can sort the call log by any of the
columns, by just clicking on that column's header. By choosing "File/Options..."
from the main menu you can adjust all the program
options as shown in these screen shots:
|
| |
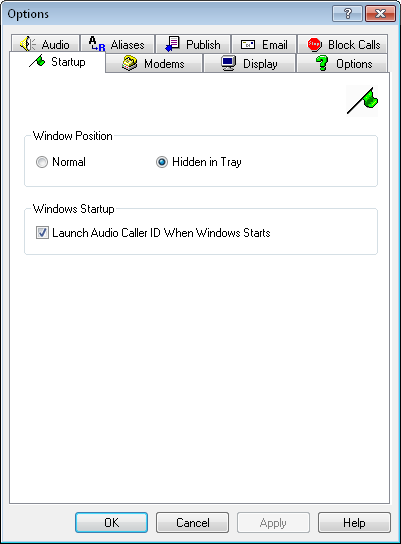 |
| Startup Options Dialog |
| Audio Caller ID
can be configured here to automatically start
whenever you turn on your computer. You can also
adjust whether the window starts up hidden to the
system task tray or displayed normally. Audio
Caller ID will always display an icon in the
system task tray, indicating the number of new
calls. |
| |
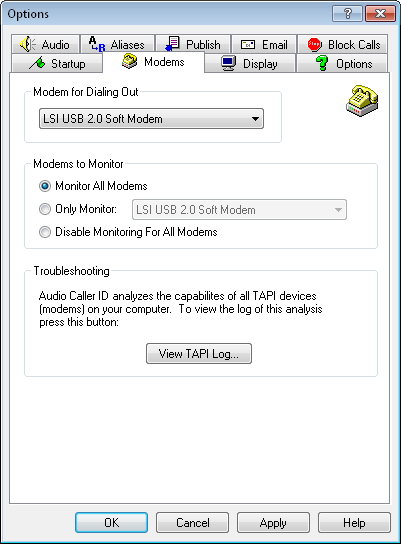 |
| Modems Options Dialog |
| With the Modems
options you choose which modems to monitor for
incoming calls, and which modem to use for
returning calls. Audio Caller ID uses TAPI to
access your modem, so it can still be used by
other TAPI applications at the same time. You
must have at least one modem installed to use
Audio Caller ID. The modem must support caller ID. Nearly all modems built within the last
15 years
support caller ID. You will also want to make
sure you have installed the latest modem driver
from your modem's manufacturer. |
| |
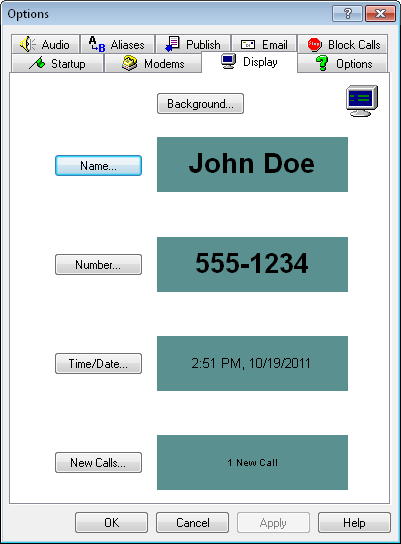 |
| Display Options Dialog |
| This dialog
allows you to adjust the font style and color for
each section in the current call pane. You can
also adjust the background color. |
| |
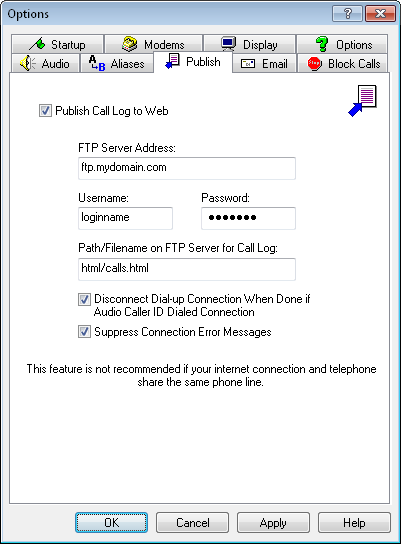 |
| Publish Options Dialog |
| Use this dialog
to enable and adjust the settings for publishing
your call log to a web site. When this feature is
enabled, your call log gets published to the web
whenever a new call comes in. This way you can
see who has called even when you're away from
home. Here is a sample call log. |
| |
 |
| Email Options Dialog |
| Audio Caller ID
can send you e-mail whenever specified calls come
in. Using this dialog you can specify which calls
you want to be e-mailed about. You can be
notified of all, none, all except those in the
list, or only those in the list. Choose the Email
Properties... button to specify your
email address, and what information is sent in
the email. The Email Properties dialog is shown
here: |
| |
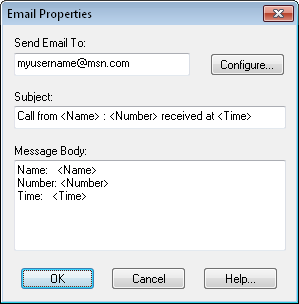 |
| Email Properties Dialog |
| Use the <Name>,
<Number>, and <Time>
keywords to insert call information into your
email. |
| |
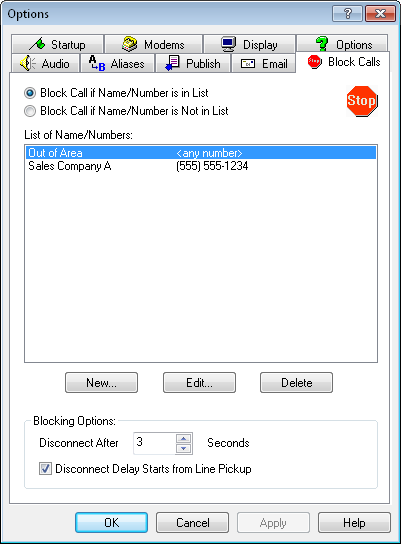 |
| Block Calls Options Dialog |
| Add callers to
this list, that you wish to block in the future. When using the blocked calls feature your modem
will pick up the line as soon as caller ID
information becomes available, and a match with
an entry in your blocked calls list is determined. In the US, the caller ID information becomes
available between the first and second rings. Once your modem picks up the line it will start
making high pitched sounds, as if it were trying
to connect to another modem. After the specified number of seconds the
call will be ended. This means "blocked" calls
will still ring once or twice before the call is
blocked. Also, when using this feature you may
want to turn off or lower the volume on your
modem's speaker. To adjust the modem's speaker go
into "Control Panel", select "Phone
and Modem Options", choose the "Modems"
tab, select your modem, and choose the "Properties"
button.
Blocked calls will
not be announced, nor will the main window be
brought to the foreground. Blocked calls will
still be placed in the call log.
Tip:
An easy way to add a call to the blocked call
list is by right clicking on a call in the log,
and select "Block Call…" from the
popup menu.
|
| |
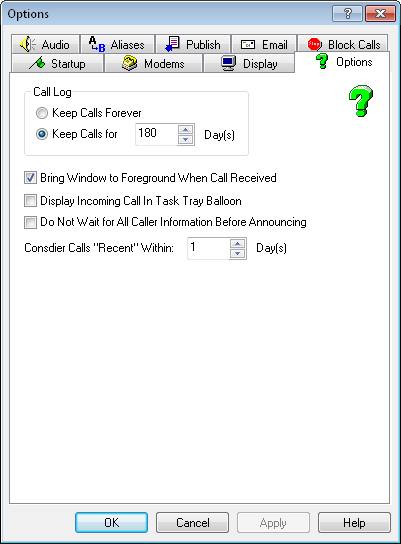 |
| Other Options Dialog |
| This dialog
allows you to specify how long calls should be
stored in your call log, and whether or not the
main Audio Caller ID window should be brought to
the foreground when a call comes in. Audio Caller ID can
also display the incoming call in a balloon tool tip down in
your task tray. When a call comes in you can configure the
list view to display how many times this caller has called
"recently". |
| |
 |
| Audio Options Dialog |
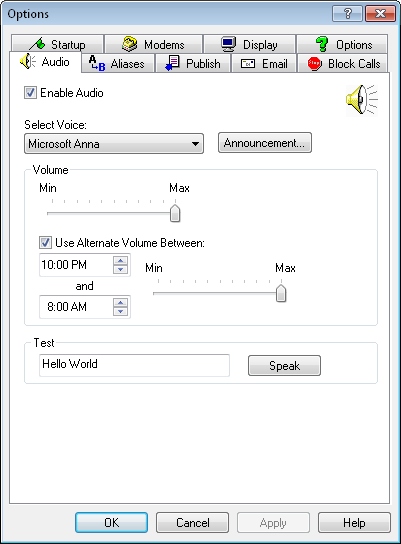
Use this dialog
to enable and set the options for announcing
incoming calls. By default Audio Caller ID uses a
Text To Speech (TTS) engine to announce incoming
callers. You can install new voices and text to
speech engines. For pointers to some freely
available TTS engines/voices visit our text
to speech
page. In addition to TTS you can also record your own
sound clips, and assign them to be played for
specific callers. Use the Alias feature to assign
your own sound clips, or change the text that is
announced for specific callers.
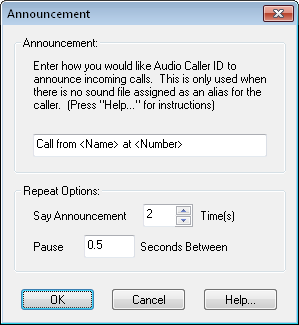
Choose the "Announcement..." button to specify how the caller
is announced when using the Text To Speech engine:
 |
| |
 |
| Aliases Options Dialog |
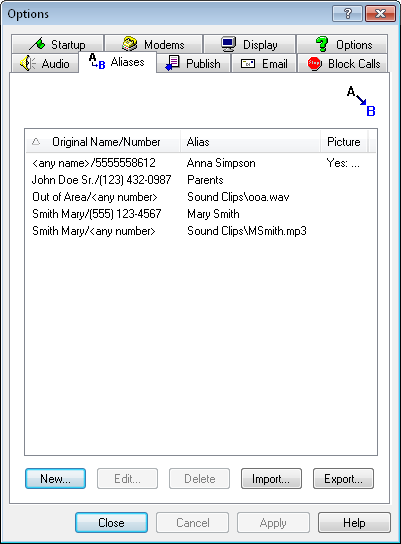
| Use this dialog
to manage aliases. Aliases allow you
to change the way a name/number is displayed and/or
announced. They also allow you to specify a picture to
display for an incoming call. You can assign alternative text for an
original name/number. You can also assign an
audio clip to be played for an original name/number. Using 2 aliases you can assign both alternative
text and an audio clip. The following dialog
shows the Alias Properties dialog that you will
see when choosing the "New..."
or "Edit..." buttons: |
| |
 |
| Aliases Properties Dialog |
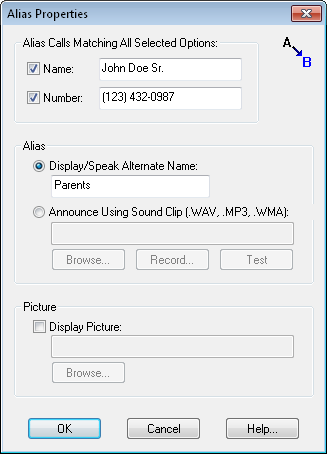
| The "Display/Speak
Alternate Name" alias type will
substitute the original name with the text you
specify here. The alternate text will be used in
the display of the name, and will also be used
when using the Text To Speech engine for
announcing incoming calls. The "Announce
Using Sound Clip" alias type will
play an audio clip when this call comes in. The
audio clip can be any .WAV, .MP3, or .WMA file. You can either Browse…
to find an existing audio clip, or press Record…
to have Audio Caller ID walk you through creating
a new audio clip. A microphone is required in
order to record your own audio clips. Press the Test
button to play the currently selected sound file.
The "Display Picture" option allows you to specify an
image to display for this caller. The image is displayed
on the right side of the current call pane.
Tip:
An easy way to create an alias is by right
clicking on a call in the log, and select "Create
Alias…" from the popup menu. This will
fill in the Name/Number fields with the
information from that call, and allow you to
assign the alias properties.
|
| |
| You can evaluate
Audio Caller ID for free by obtaining a copy from
the download page. On the support page there are some additional
helpful techniques and related links. After evaluation of the
program, go to the purchase page to
obtain a license. |